2주차 블로깅!!!입니다
1. 반복문
1-1. for 문
for (let num = 0; num < 5; num++) {
    console.log(num);
}
// 0 1 2 3 4 출력- 이때, 0은 초기값
중첩 사용의 예> 구구단
for (let i = 1; i <= 9; i++) {
  for (let j = 1; j <= 9; j++) {
    console.log(i + ' X ' + j + ' = ' + i * j);
  }
}
1-2. continue & break
for (let num1 = 0; num1 < 100; num1++) {
    if (num1 % 3 === 0) continue; // 3의 배수인 수 건너뜀
    if (num1 > 10) break; // 10 이하까지만
    console.log(num1);
}
1-3. for ... of 문 : 배열의 요소 순서대로 반환
const myArray = ['한놈', '두시기', '석삼'];
for (const item of myArray) {
	console.log(item);
}
1-3. for ... in 문 : 객체의 키 순서대로 반환
const person1 = {
	name: '강민지',
	age: '22',
	married: false
}

for (const key in person1) {
	console.log(key, typeof key);
}
for (const key in person1) {
	console.log(person1[key]);
}- person1.key : error -> key는 속성이 아닌 변수이기 때문
1-4. while 문 vs do ... while 문
// while 문
let x = 0;
while (x < 10) {
console.log(x++);
}
// do ... whlie 문
let x = 12;
do {
console.log(x++);
} while (x < 10);- while 문 : 조건을 확인한 후 실행
- do ... while 문 : 한 번 실행한 뒤 조건 확인
2. 함수
console.log('');

// 함수 선언
function 함수이름 (매개변수) {
console.log('');
...
}

// 함수 실행
함수이름 (매개변수);
2-1. 매개변수 & 인자
- 매개변수 : 함수 안에서 사용할 이름
- 인자: 매개변수에 대입하는 값
2-2. return(함숫값 반환)
function add(x, y) {
	return x + y;
}

console.log(
  add(add(6, 7), add(8, 9))
); // 출력 30
2-3. 화살표 함수 (=>)
const mult = (x, y) => x * y;
console.log(mult(2, 7));- function 명령어 보다 더 간결한 문법
3. HTML 요소들 선택하기
: 웹사이트를 조작(EX. 텍스트가 들어있는 요소 제거, 클래스 바꾸기 등)하기 위해서는 요소를 선택해야함
3-1. getElementsByTagName
document.getElementsByTagName('section');// 상수/변수 저장o
const $listItems = document.getElementsByTagName('li');
console.log($listItems);
- 태그명으로 요소 선택
- document -> 우리가 따로 선언하지 않아도 됨. 웹사이트 같은 존재
3-2. getElementsByClassName
document.getElementsByClassName('plant');- 클래스로 요소 선택
3-3. getElementById
document.getElementById('sweets');- 아이디로 요소 선택
3-4. querySelector VS querySelectorAll
- CSS 선택자로 요소 선택
document.querySelector('section');
// 첫 번째 요소만 반환
document.querySelectorAll('section');
// 모든 요소 반환
document.querySelector('.plant > ul > .soldout');
// 클래스 안에 있는 자식들도 선택 가능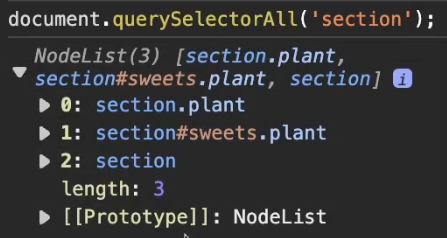
3-5. children
document
.querySelector('section')
.children;- 자식 요소들( h2, ul ... ) 반환
3-6. firstElementChild VS lastElementChild
const $firstUl = document.querySelector('ul');
$firstUl; // ul 요소 출력

$firstUl.firstElementChild; // ul의 자식 li 첫번째 요소 출력- 첫 번째 / 마지막 자식 요소 반환
- 이때, $는 컨벤션으로 상수가 통로로 저장될 때 사용됨. --- 개발자들이 '아 이건 웹사이트 상의 한 요소구나~' 하고 파악할 수 있음
3-7. parentElement
$firstUl.parentElement;- 부모 요소 반환
4. 요소들 조작하기
4-1. textContent
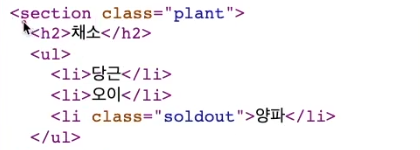
const $carrot = document
.querySelector('section > ul > li');
$carrot;
$carrot.textContent; // 출력 '당근'
$carrot.textContent = '제주당근'; // 텍스트 수정 '당근'->'제주당근'- 요소의 텍스트 확인 & 수정
4-2. classList
const $onion = document
.querySelector('section ul')
.lastElementChild;
$onion;
$onion.classList; // 클래스 확인
$onion.classList.remove('hidden'); // 클래스 제거
$onion.classList.add('organic'); // 클래스 추가- 여러 개의 클래스를 목록 형태로 확인 & 내용 수정
- 페이지 소스는 원본 내용이기 때문에 변경해도 반영 안 됨!!
$onion.classList.toggle('soldout');- toggle : 특정 클래스 on/off 기능
4-2. style
$onion.style.fontSize; // 스타일 확인
$onion.style.fontSize = '1em'; // 스타일 수정 (camelcase - js 방식)
4-3. getAttribute & setAttribute
$hyperlink.getAttribute('href');
$hyperlink.setAttribute('href', 'https://wink.kookmin.ac.kr');- 클래스 이외의 속성 반환 & 수정
4-4. value & checked
1. 요소(message, toggle) const(상수)에 저장 및 선택
ㅣ
2. $message.value; // 'Hello!' 반환
3. $message.value = '안녕하세요'; // 수정
2. $toggle.checked = !$toggle.checked; // 체크박스 T/F
4-5. removeChild
1. ul 요소 const에 저장 및 선택
ㅣ
2. $ul.removeChild($onion); // '양파' 제거됨
*while문을 이용해서 첫번째부터 모든 자식 요소 지우기도 가능
*그 외 createElement(태그명으로 요소 선택), appendChild(요소를 대상 요소 안에 넣음) 등이 있음!
5. 이벤트
5-1. addEventListener
myButton.addEventListener('click', function () {
	console.log('클릭');
});
// click에 function 대입- 두번째 인자 function () ~~ : 콜백함수
5-2. 이벤트 객체
// 인자자리에 e 대입, 이벤트 객체 clientX & clientY -> 좌표 나타냄
clickPosition.addEventListener('click', function (e) {
	let text = 'x: ';
	text += e.clientX;
	text += ', y: ';
	text += e.clientY;
	clickPosition.textContent = text;
});- clientX & clientY 이외에도 다양한 객체가 있음
focus / blur 이벤트
- 창에 입력하는 중인지/아닌지 알 수 있음
e.target.value & e.key
- 인풋 요소(한영, 숫자, key 등)의 값이 바뀔 때
## 최종 프로젝트
1. 네비게이션 항목(메뉴) 추가
- document.createElement("li") -> 새 항목 만들기
- appendChild()로 추가
2. about 항목들(웹사이트 설명) 추가
- createElement("li") -> 새 <li> 만들기
- textContent = "About" -> 글 입력
- appendChild() -> 네비게이션 항목(<ul>)에 추가
3. 커리큘럼 마우스오버 애니메이션 : 마우스 올렸을 때 나타나는 효과 넣기
- $currLis = document.querySelectorAll('.curriculum__list > li'); -> 커리큘럼 불러오기
- mouseover, mouseout 이벤트 만들기
'WINK-(Web & App) > React.js 스터디' 카테고리의 다른 글
| [2025 1학기 React.js 스터디] 이종민 #2주차 (0) | 2025.04.04 |
|---|---|
| [2025 1학기 React.js 스터디] 백채린 #2주차 (0) | 2025.04.04 |
| [2025 1학기 React.js 스터디] 정채은 #2주차 (0) | 2025.04.04 |
| [2025 1학기 React.js 스터디] 최은희 #2주차 (0) | 2025.04.04 |
| [2025 1학기 React.js 스터디] 이가인 #2주차 (0) | 2025.04.03 |


